Hey Guys, welcome back to another How-to guide. In this Article I’m going to show you how to install TWRP on Redmi 7A device. Do you know, You can install TWRP via 3 different ways. Every method is easy, as you can implement easily.
Here are the three different methods to install TWRP on Redmi 7A.
- Install TWRP on Redmi 7A Via TWRP Application
- Install TWRP on Redmi 7A Via Flashify
- Install TWRP on Redmi 7A Via PC/Laptop
So these are 3 methods to install TWRP on your Redmi Device. Flashify is just like the official application of TWRP. I’m a regular user of flashify app. That’s why I recommend this method to install. But wait, my dear friend. Because I want to show you some key features of the Redmi 7A device.
I hope you enjoy this guide. Now let me explain to you the key features.
Page Navigation
Key Features Of Redmi 7A Device
These are the most loved key features of the MI 7A device. So let’s explore these features-

| Display | 5.45 inches, 76.7 cm2, IPS LCD capacitive touchscreen |
| Battery | Non-removable Li-Po 4000 mAh battery |
| Memory | microSDXC(dedicated slot) , 16GB 2GB RAM, 32GB 2GB RAM, 32GB 3GB RAM |
| Camera | 12 MP, f/2.2, 1/2.9″, 1.25µm, PDAF – Global, India |
| Selfie Camera | 5 MP, f/2.2, 1/5″, 1.12µm |
| Sensors | Accelerometer, proximity, compass |
| OS / Chipset /CPU /GPU | Android 9.0 (Pie), Qualcomm SDM439 Snapdragon 439, Octa-core (4×1.95 GHz Cortex-A53 & 4×1.45 GHz Cortex A53) / Adreno 505 |
What is TWRP?
TWRP stands for TeamWin Recovery Projects. It helps you to customize your android device. And allow you to make system changes. You can do a lot of things and you can say that your device will behave like a super device.
The pros section will completely show you the advantages of installing TWRP on the Redmi 7A device. Are you excited to know about the merits of TWRP on this Redmi device? Before that, I want to guide you with some Pre-requirements, so that you can easily install TWRP on your device.
Pre-requirements For Installing TWRP on Redmi 7A
In other words, you can say that these things are necessary for installing TWRP on your MI device. You can’t install TWRP on your Xiaomi device without following these points. So let’s discuss some requirements. These are
- Unlock Redmi 7A Bootloader
- Enable USB debugging and also enable OEM
- Charge device battery at least 60-70%
- Make sure you have a PC/Laptop (This is for the third method )
Below I’m going to explain the above mention points. If you already know then I request you to skip this step. This section is only for new users who don’t know the meaning of Pre-requirements. Why this is important to implement before installing TWRP.
Pros Of Installing TWRP on Redmi 7A
TWRP provides you a lot of benefits once you install this on your MI 7A device. This line touch heart, because our mind likes the benefit word. This is off-topic let’s come on our topic. Sometimes many people install TWRP after reading the advantage, and here we win. Because we clear users every point. So let’s discuss advantages –
- You can install Custom ROM On the Redmi 7A Device
- Easily able to remove pre-installed applications
- Remove device bloatware
- Increase device battery performance
- Install Any Custom ROM which you want
- Update the latest version of android
- Take a complete backup of the device
You can install custom ROM according to your needs. But keep it in mind ROM should not be corrupted.
Cons Of Installing TWRP on Redmi 7A
With pros, TWRP contains a lot of demerits which we mention below. Demerits don’t stop any user to install TWRP because I think Pros are enough to explain to you. why you should install TWRP On the Xiaomi 7A device. I hope things are clear in your mind so let’s talk about demerits –
- 100% warranty loss of MI device
- You’re not able to claim any warranty
- The device would brick if you’ll do any mistake while installing TWRP
- Sometimes devices stop working
- MI 7A device will no longer secure
- You can’t use any banking application
All these are major demerits of installing TWRP. I hope now you’re mind is set to install TWRP after reading this. Many users drop their mindsets to install TWRP due to these reasons. But my friend if you want more features on your handy device then you have to take risks.
That’s all I wanna say. Now I’m going to show you the promised method to guide the installation process.
3 Methods To Install TWRP on Redmi 7A Device
So as I promised above I’ll guide you with three different ways to install TWRP on your MI device. Let me explain something the first two methods don’t require any PC/Laptop to install TWRP on this Xiaomi device. But the third method requires a PC or Laptop to complete this process. If you’re doing this first time, then I recommend you to 7A with the first two methods because they don’t have any such requirements. So you can easily implement it.

Let’s learn about the installation process via various methods.
Guide To Install TWRP On Redmi 7A Via TWRP Application
This is the official method of the TWRP installation Process. So don’t worry about the success rate. If you’ll follow all steps carefully. Then I’m sure, you can easily install TWRP On your Xiaomi device. So start official method –
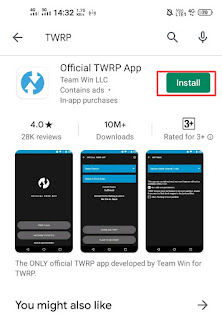
- Download TWRP Official Application from play store –
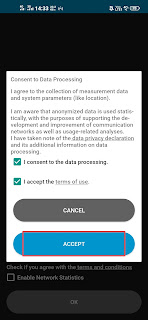
- Now install the application and accept terms and conditions
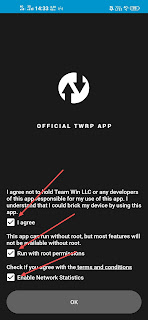
- Tap the Option Run With Root Permission
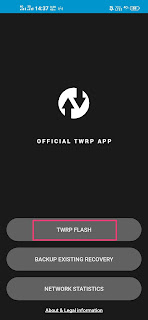
- Now click the TWRP Flash Option and accept their conditions
- Find your device name in the search box by entering the device name (Redmi 7A)
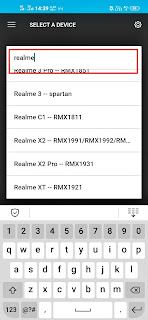
- If Redmi 7A image file available then download on-device storage
- After downloading go Back To The Application and Tap on ” Select a File To Flash “

- Now find the downloaded file and select
- After Selection tap on “Flash to Recovery” and then tap on Confirm
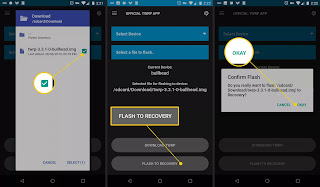
That’s all you have to do. ? By following the above steps you successfully install TWRP on your MI 7A device. This is the easiest method that I see in my life. Rather than if you face any kind of issue the without hesitating let me know in the comment section. If you want more expertise solution. Then make sure you check out this XDA Developers guide – https://forum.xda-developers.com/redmi-7a/how-to/guide-twrp-root-magisk-custom-rom-t4027441
We’ll try to solve your query as soon as time allows us. Right now take a break. If you’re excited to know another method then take a look at the below section.
Guide To Install TWRP OnRedmi 7A Via Flashify App
After the TWRP official app, this method is our most trusted method to install TWRP. Because of its easy-to-use interface. So let me clear something before you use this app. This app also requires root access to your MI device. So if you wanna install TWRP then you have to root your device first. Now let’s talk about flashy and how it works.
- First, Download Flashify application From Play Store –
- Now download the TWRP file for Redmi 7A device from twrp official website
- Open the flashify app
- You have to give the permission of SuperSu
- Tap on Recovery image

- Click to choose the image file which you download then click ok

- Once you select the file then after a couple of minutes. You’ll see a notification that you have successfully install TWRP Recovery on your Redmi 7A device via Flashify application.
If you want information about this topic then make sure you check out this official MI community thread – https://c.mi.com/thread-2463103-1-0.html
I hope this helps you to clear your doubts. If you want to Root Redmi 7A then make sure you check out the magisk update guide.
Guide To Install TWRP On Redmi 7A Via PC/Laptop
- First, Download the Odin Flash tool for Xiaomi Device, And Extract it on your PC
- Next Download TWRP for your Redmi Device from Check out
- Boot Redmi 7A in fastboot mode
- To Boot Xiaomi 7A in fastboot Mode, you have to Turn Off then Press and
Hold Bixby + Volume Up + Power key
- Now you have to Boot Mi 7A in Download Mode, do that, turn it off and Press and hold Bixby + Volume Down button together to turn on the phone. Now press Up Screen to boot in Download Mode
- Connect your Smartphone to Computer using the USB port
- Now Open Odin in Your PC
- Next now ID: COM tab on your Odin will turn Blue which means your phone is successfully recognized by the Odin flash tool If it doesn’t reconnect your Device and check again.
- Now tap on the AP button on the Odin Tool and Select TWRP recovery for Redmi 7A you downloaded Before
- Now Tap on Start Button
- Sometime you will see the “PASS” Button on Screen which means TWRP recovery is successfully installed on your Phone
This method is complete with the PC. So if you don’t have a PC or laptop then make sure you read above mention two methods.
Related Articles
Here another step to clear all doubts on your mind about this topic. Here we added some related articles of the MI device. If you’re facing any kind of problem during installation then you can read another Xiaomi device process, about how to install TWRP.
I HOPE YOU GOT MY POINT.
Summary
This article is all about the installation process of TWRP on the MI device model Redmi 7A. So first I showed you the key features of this specific device. After that some necessary steps which are important before installing TWRP. I already explained above why these steps are important.
After that, I mention the pros and cons of installing TWRP on the MI 7A device. Because many people love to read merits before doing anything. This is the only reason why I added that section.
Next, I cover various methods to install TWRP so the user can implement any method, which is easy for him/her. We don’t stop there we also added a related articles section because sometimes users confuse to find, i.e if I see another article like this then I can do this. So clearly this myth we added a related article section.
We hope this will help you. If you think we made a mistake then let us know in the comment section also you have any kind of doubt then you can ask in the comment section. We’ll reply as soon as possible.
Rest spread love by sharing this article with your friend who interested in this topic.
Stay Home Stay Safe.
See you in the next article?.